In this tip, network engineers can learn how to configure a new PIX firewall, out of the box. You will configure passwords, IP addresses, network address translation (NAT) and basic firewall rules.
PIX firewall configuration from scratch
The following article was originally posted at SearchNetworking.com and it is reproduced with their permission.
![]()
![]()
Let’s say that your boss hands you a new PIX firewall. It has never been configured. He says that it needs to be configured with some basic IP addresses, security and a couple of basic firewall rules. You have never used a PIX firewall before. How will you be able to perform this configuration? After reading this article, it should be easy. Let’s find out how.
The basics of a Cisco PIX firewallA Cisco PIX firewall is meant to protect one network from another. There are PIX firewalls for small home networks and PIX firewalls for huge campus or corporate networks. In this example, we will be configuring a PIX 501 firewall. The 501 model is meant for a small home network or a small business. PIX firewalls have the concept of inside and outside interfaces. The inside interface is the internal, usually private, network. The outside interface is the external, usually public, network. You are trying to protect the inside network from the outside network. PIX firewalls also use the adaptive security algorithm (ASA). This algorithm assigns security levels to interfaces and says that no traffic can flow from a lower-level interface (like the outside interface) to a higher-level interface (like the inside interface) without a rule allowing it. The outside interface has a security level of zero and the inside interface has a security level of 100. Here is what the output of the show nameif command looks like: Notice the ethernet0 interface is the outside interface (its default name) and the security level is 0. On the other hand, the ethernet1 interface is named inside (the default) and has a security level of 100. Guidelines for Configuring a PIX FirewallBefore beginning the configuration, your boss has given you some guidelines that you need to follow. Here they are:
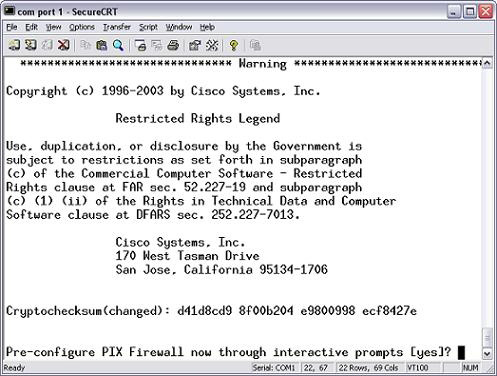
Initial PIX Firewall ConfigurationWhen you boot up your PIX firewall for the first time, you should see a screen like this:
You will be prompted to answer YES or NO as to whether or not you want to configure the PIX through interactive prompts. Answer NO to this question because you want to learn how to really configure the PIX firewall, not just answer a series of questions. After that, you will be sent to a prompt that looks like this: With the “greater than” symbol at the end of the prompt, you are in the PIX user mode. Change to privileged mode with the en or enable command. Press “enter” at the Password prompt. Here is an example: pixfirewall> en You now have administrative mode to show things but would have to go into global configuration mode to configure the PIX. Now, let’s move on to basic configuration of the PIX: Basic PIX configurationWhat I am calling basic configuration is made up of three things:
Before you can do any of these things, you need to go into global configuration mode. To do this, type: pixfirewall# config t To set the hostname, use the hostname command, like this: pixfirewall(config)# hostname PIX1 Notice that the prompt changed to the name that you set. Next, set the login password to cisco, like this: PIX1(config)# password cisco This is the password required to gain any access to the PIX except administrative access. Now, configure the enable mode password, used to gain administrative mode access. PIX1(config)# enable password cisco Now we need to configure IP addresses on interfaces and enable those interfaces. The PIX, unlike a router, has no concept of interface configuration mode. To configure the IP address on the inside interface, use this command: PIX1(config)# ip address inside 10.1.1.1 255.0.0.0 Now, configure the outside interface IP address: Next, enable both the inside and outside interfaces. Make sure that the Ethernet cable, on each interface, is connected to a switch. Note that the ethernet0 interface is the outside interface, and it is only a 10base-T interface on a PIX 501. The ethernet1 interface is the inside interface, and it is a 100Base-T interface. Here is how you enable these interfaces: PIX1(config)# interface ethernet0 10baset Note that you can do a show interfaces command, right from the global configuration prompt line. Finally, let’s configure a default route so that all traffic sent to the PIX will flow to the next upstream router (the 1.1.1.254 IP address that we were given). Here is how you do this: PIX1(config)# route outside 0 0 1.1.1.254 The PIX firewall can, of course, support dynamic routing protocols as well (such as RIP and OSPF). Now, let’s move on to some more advanced configuration. Network Address TranslationNow that we have IP address connectivity, we need to use Network Address Translation (NAT) to allow inside users to connect to the outside. We will use a type of NAT, called PAT or NAT Overload, so that all inside devices can share one public IP address (the outside IP address of the PIX firewall). To do this, enter these commands: PIX1(config)# nat (inside) 1 10.0.0.0 255.0.0.0 With this, all inside clients are able to connect to devices on the public network and share IP address 1.1.1.2. However, clients don’t yet have any rule allowing them to do this. Firewall rulesThese clients on the inside network have a NAT translation, but that doesn’t necessarily mean that they are allowed access. They now need a rule to allow them to access the outside network (the Internet). That rule will also allow the return traffic to come back in. To make a rule to allow these clients port 80 (Web browsing), you would type this: PIX1(config)# access-list outbound permit tcp 10.0.0.0 255.0.0.0 any eq 80 Note that PIX access lists, unlike router access lists, use a normal subnet mask, not a wildcard mask. With this access list, you have restricted the inside hosts to accessing Web servers only on the outside network (routers). Showing and saving the configurationNow that you have configured the PIX firewall, you can show your configuration with the show run command. Make sure that you save your configuration with the write memory or wr m command. If you don’t, your configuration will be lost when the PIX is powered off. |
Hi, thx for this article, it’s very useful… what about if we have more than two interfaces??
How we have to configure the NAT between interfaces?
Thanks
Tofom from Italy
its a great site that i hv seen, please keep updating. its a good site where all the begineers like me to learn based on the setting howto. thanks aloot sir.
Hi David Davis , it is very good site which i have come across, it will be very very useful for the beginners who will jump to networking industry.. Your effort is higly appreciated
Hi David Davis ,
You are doing wonderful job and you are really having a great knowledge of networking .
Really david i m impressed a lot and keep posting articles ,
Hi David,
This is very informative website. However, currently I have a PIX 501 that I couldn’t get in because the tech has forgot the password.
Could you give me the details on how to reset my cisco 501? Appreciate it very much.
Thanks a lot and more power to you.
The Cisco PIX Password Recovery Process is at-
http://www.cisco.com/en/US/products/hw/vpndevc/ps2030/products_password_recovery09186a008009478b.shtml
how to verify this configuration?..